by Craig O. Olsen
Originally Published in the IAMC Newsletter, December 2012
Like many of you, I came to dual sport riding late in life. Loving to ride the twisty paved mountain roads, for years I would slow down when passing a gravel or dirt road leading off the pavement and winding up into the forest. I would longingly wonder where that road went and what adventures traveling it would bring me. Finally, five years ago I purchased my first dual sport bike and began exploring those less traveled roads; and on my, the adventures I have had!

There is no doubt that learning to ride a dual sport bike off-road has made a much better rider out of me. I quickly learned that some of those roads led to difficult rocky sec9ons requiring skills to traverse that ini9ally I did not possess. Only with repeated practice of the 9ps learned from more seasoned riders did I eventually gain the skill set to tackle and overcome these more difficult sec9ons. And that has made all the difference in where I am able to ride and how safely and confidently I am able to get there and back. Here are just a few things that I have learned along the way.
Body Position: The goal of proper body positioning on the bike is to minimize fatigue while maximizing control. It has been said that developing a good understanding of basic riding position is one of the most important things in helping you become a better rider. The more of a habit the correct body position becomes, the better your riding will be. Body position is always changing with the terrain, conditions and speed. [1]

The basic body position is to have your weight centered on the seat , and your head over the triple clamps with your elbows up and out away from your sides so that you over-grip the throttle across your palm, not across your knuckles (like turning a door knob). Your feet should be centered on the pegs much like a ball joint such that you can rock front to back and side to side, especially when standing.
Standing allows better control by allowing you to act on the bike rather than be acted upon. The basic or neutral position when standing is with the feet centered on the pegs, the knees slightly flexed and the hips above the pegs. Your back is slightly arched. This position is used when traversing level ground. When climbing or accelerating, shift your body weight forward with your hips in front of the pegs, and when descending or decelerating, shift your weight backward with your hips behind the pegs.
In the standing position your head will be over the triple clamps with your elbows up and out away from your sides similar to the sitting position. Your weight should be supported on the pegs thus lowering the center of gravity of the bike and rider , and not on the handle bars, which has the effect of raising the center of gravity toward the highest point on the bike. When transitioning from the sitting to the standing position, all the ac9on should come from the legs such that you do not pull yourself to a standing position using the handle bars. [2]
Your grip on the bars should be firm (not tight) and your arms and shoulders loose and relaxed, not tight or tense. The more aggressive the climb or acceleration, the more your weight should be shifted forward in front of the pegs with your head above or even in front of the triple clamps. The more aggressive the descent or deceleration, the more your weight should backward behind the pegs, and your head will be behind the triple clamps.
You should cover and operate the clutch and front brake levers with one or two fingers only, leaving your other fingers to secure the grips. Adjust the levers downward below the level of the grips so that your hand remains in a neutral position (not cocked up) with one or two fingers on them when standing. This is important both for riding comfort and safety in operating the clutch and front brake.
Picking Your Line: The key to riding difficult terrain strewn with rocks, ruts and holes is to keep your head up. Look down the trail as far ahead as the trail, speed and common sense allows. Look where you want to go and the bike will naturally follow an invisible line towards where you are looking. If you see a large rock or pothole, do not allow your eyes to fixate on it, otherwise you will hit it — a phenomenon called target fixation. Take it in, and then allow your eyes to continue to move beyond or to the side of it. The bike will follow your eyes and avoid the obstacle automatically. [3]
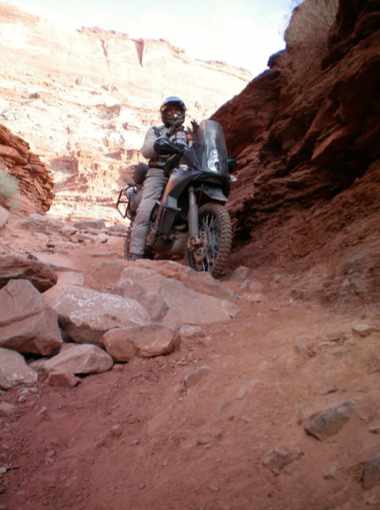
By always looking ahead you can usually see a bad patch, such as rocky terrain, before you actually ride over it. This is your cue to slow down, stand up and look to the end of it or far enough down it that you can pick your line of travel through it. That way you have room to gently accelerate through the bad sec9on without staring to go too fast. Keep your eyes fixed on the exit point as you shift your weight forward and gently accelerate through the bad patch. By keeping your forward momentum up and gently accelerating, you will stabilize the bike more as it passes over the rough sec9on. [4]
If you find that the bike moves around a bit, give it a bit more gas, and the bike will steady up. By standing you allow the bike to move and bounce around freely beneath you as it moves over the uneven surface, and your arms and legs will absorb some of the uncontrolled mo9ons from your bike. [5]
Do as little turning as possible over loose rocks. If you have to ride through a sec9on of loose rocks, pick as direct a line as you can and stick to it, focusing on the exit point. Feather the clutch as needed to prevent unnecessary wheel spin. You have better traction and control when the rear wheel is hooked up rather than spinning.
When picking a line through a rough sec9on, look for good traction even if it is over rougher embedded rocks rather than the smaller loose ones adjacent to them. On cambered sec9ons of a trail the loose debris and rocks usually migrate to the lower segment, so pick the higher berm for better traction.
When encountering sharp turns on rocky or rough sec9ons, stay to the outside un9l you can see around or well into the turn, and then turn into the turn late. This gives you more op9ons for picking your line out of the turn into the next sec9on, and it applies whether you are on the level, climbing or descending. Also, when turning on any loose surface, weight the outside peg through the turn to keep the bike more upright and counter balanced through the turn. This keeps both front and rear wheels more firmly planted through the turn and less likely to wash or slip out.
When possible, try to cross rock ledges (step-offs), ruts or roots at a right angle to prevent them from inadvertently turning your front wheel along the edge of them.
When riding rocky terrain, choose a line, commit to it and look ahead. With modern bike suspensions you can attack obstacles without tensing up or manhandling the bike. Let the bike do the work it is designed to do. You and your bike are a team. Use the principles of weight distribution and body poisoning described above, and work with your bike, not against it.
Ride Your Own Ride: As you are building your off-road riding skills, stay within your comfort zone. Don’t take on unnecessarily difficult terrain un9l you have practiced and mastered the skills to do so. When riding with a group, spread out. Riding too close together, especially over rough terrain, is asking for trouble if the rider ahead suddenly slows down, stops or worse yet, 9ps over.
You don’t have to keep up with the rider ahead of you all the 9me. It is far safer to ride your own ride at your rate, especially through the rough stuff, and then catch up at each junction.
If the terrain becomes too challenging, especially going up a steep rocky sec9on, find a safer place to turn around and head back. Generally, going down a difficult rocky sec9on is easier than going up it. Just remember to keep your weight back as far as you can while standing with your butt just off of the seat of the bike. Use a lower gear to control your down hill speed (braking by engine compression) and use the front brake cautiously not to lock the front wheel. Use the rear brake less and do not lock it.
Additional Instruction: I have had no experience taking any off-road motorcycle training courses, but I know of riders who have, and they highly recommend these courses. While I am not aware of any such courses in Idaho, some in the region were reviewed in a previous club newsletter article. [6]
There are instructional videos available on the internet that review some of the techniques for riding rough rocky terrain, as well as other aspects of off-road dirt bike riding. [7-8] Two excellent instructional DVDs for beginning and advanced dual sport riding techniques are available on the internet along with PDF files containing instructional drills that review many of the concepts discussed in this article. [9]
Whatever you do, don’t let those difficult rocky sec9ons you encounter intimidate you. Practice and improve your riding skills un9l you feel more comfortable riding them. If you can’t envision success, you won’t attain it.
References
1. Donnie Bales with Gary Semics, Pro Motocross and off-Road Motorcycle Riding Techniques, 1996, MBI Publishing Company, pg. 39.
2. Dual Sport Tips for the Rocky Ride. http://www.soundrider.com/archive/9ps/dual_sport_9ps_for_the_rocky_ride.htm
3. Riding a Motorcycle Across Loose Terrain – Rocks, Logs & Debris. http://ezinear9cles.com/?Riding-a-Motorcycle-Across-Loose-Terrain—Rocks,-Logs,-and-Debris&id=1499943
4. Off Road Naviga9on. http://www.flamesonmytank.co.za/offRoad.htm
5. MX Bike Riding Tips. http://www.adventuremx.co.za/mxride9ps.htm
6. Craig O. Olsen, The Start of a New Riding Season, IAMC Newsletter (4-2012 Issue 2). http://motoidaho.org/node/836
7. Adventure Riding – Riding Loose Rocks. http://www.youtube.com/watch?v=tR1wK2fsiIc
8. Off-road Fanatic. http://www.youtube.com/user/TheOffroadfana9c?feature=watch
9. Dual Sport Riding Techniques. http://www.dualsportriding.com/